VxWorks SDK Application Developer Guide
Table of Contents
About
The role of the Application Developer is to create Downloadable Kernel Modules (DKMs), Real-Time Processes (RTPs), and libraries for a given VxWorks Source Build (VSB) and VxWorks Image Project (VIP).
The Software Development Kit (SDK) provides the Application Developer with the tools necessary to compile, debug, and test new applications/libraries.
RTP - An executable application that runs in user-space as a process. RTPs run in its own environment which cannot directly interact with other resources not mapped on to it, adding robustness.
RTPs produce a VXE which can be loaded from a target file system (RomFS, NFS, SD card) or directly from a WRDBG debug connection.
DKM - A kernel application that runs in kernel-mode as tasks, with full access to the system hardware.
DKMs produce a relocatable object module that can be statically linked with the VxWorks kernel at VIP build time, dynamically loaded from a target file system (RomFS, SD card),
or loaded directly from a WRDBG debug connection.
Note: When using the supplied debugger, RTP applications must be given a .vxe file extension and DKM applications must be given a .out file extension.
Prerequisites
-
Python 3.6+
Linux
sudo apt-get install <PYTHON_EXECUTABLE> && <PYTHON_EXECUTABLE> -m pip install -U pip
Example:
sudo apt-get install python3 && python3 -m pip install -U pip
Windows
Download and ensure Add Python to PATH is selected when installing.
-
A generated SDK produced by the Platform Developer
SDK Directory Structure
The following is an example of the SDK directory:
WRSDK_VXWORKS-7_<VIP_NAME>_<VSB_ARCH>_<HOST_TYPE>_<TIMESTAMP>
│
└───bsps    # Contains VxWorks images and files related to booting
│   │
│   └───<BSP_NAME>
│       │
│       └───boot
│       │   │
│       │   │ vxWorks
│       │
│       └───uboot
│       │   │
│       │   │ uVxWorks
│       │   │ vxWorks.bin
│       │
│       └───readme
│           │
│           │ readme.md
│
└───toolkit    # Contains application developer tools for cross-compilation
│   │
│   │ wind_sdk_env.linux/wind_sdk_env.bat
│   │
│   └─── host_tools
│   │
│   └─── wrdbg_tools
│   │
│   └─── sdk_tools
│   │   │
│   │   └─── qemu
│   │
│   └─── bin
│   │
│   └─── compilers
│   │
│   └─── include
│   │
│   └─── license
│
└───artifacts    # Contains build artifacts to recreate the VxWorks VSB and VIP projects. This directory only exists if the Platform Developer generated the SDK using the `-a` argument.
│   │
│   │ <VIP_PROFILE>.cdf
│   │ vsb.config
│
└───examples    # Contains a buildable set of examples for the application developer
│
└───docs    # Contains VxWorks API and BSP documentation
│   │
│   │ FusionSDK-Application-Developer.md
│   │
│   └───resources
│   │
│   └───vxworks-7
│       │
│       └───html
│       │
│       └───man
Application Development
Command-line
Command-line Prerequisites
Setting up the Application Developer SDK environment is the first and most crucial step when developing with the SDK.
To begin. ensure that the following prerequisites are met each time you begin development within a new terminal.
-
Ensure that the top-level prerequisites have been completed
-
Move into the base directory of the generated SDK
-
Source the SDK environment file to update your PATH and environment variables, gaining direct access to the tools included within the SDK
Linux
source toolkit/wind_sdk_env.linux
Windows
toolkit\wind_sdk_env.bat
With the SDK environment set up, you are ready to begin creating, compiling, and running applications.
Compiling Applications
Compiling applications for VxWorks is achieved in pretty much the same fashion as it is for any C/C++ project (make, cmake, etc.).
Example Makefiles can be found within the examples/makefiles directory.
Compiling RTPs
-
Move into the RTP project directory.
-
Create a Makefile for the RTP project (example Makefile files can be found within the examples/makefiles directory).
-
Run the following command to compile the RTP project:
make
RTPs can also be compiled without a Makefile:
Linux
$CC <RTP_FILE>.c -o <NAME_OF_OUTPUT>.vxe -static
Example:
$CC rtp.c -o rtp.vxe -static
Windows
%CC% <RTP_FILE>.c -o <NAME_OF_OUTPUT>.vxe -static
Example:
%CC% rtp.c -o rtp.vxe -static
Compiling DKMs
-
Move into the DKM project directory.
-
Create a Makefile for the DKM project (example Makefile files can be found within the examples/makefiles directory).
-
Run the following command to compile the DKM project:
make
DKMs can also be compiled without a Makefile:
Linux
$CC -dkm <DKM_FILE>.c -o <NAME OF_OUTPUT>.out
Example:
$CC -dkm dkm.c -o dkm.out
Windows
%CC% -dkm <DKM_FILE>.c -o <NAME_OF_OUTPUT>.out
Example:
%CC% -dkm dkm.c -o dkm.out
Compiling CMake RTPs
-
Move into the CMake RTP project directory.
-
Copy the required Preload.cmake and vxsdk_toolchain.cmake CMake files into the RTP project directory. These files can be found within the examples/cmakefiles directory.
-
Create a CMakeLists.txt for the RTP project (example CMakeLists.txt files can be found within the examples/hello_cmake_rtp/RTP and examples/lua_cmake_rtp/RTP directories).
-
Run the following command to start the CMake process:
cmake -DCMAKE_TOOLCHAIN_FILE=vxsdk_toolchain.cmake .
NOTE: Warnings may be present during the CMake process.
-
Once CMake has generated the appropriate Makefiles, run the following command to compile the RTP project:
make
Running Applications
Running RTPs
-
Using the wrdbg shell, connect to the target hardware or virtual machine.
-
Locate the location of the compiled RTP on the host machine.
-
Using the wrdbg shell, load the RTP application onto the target hardware or virtual machine:
file <PATH_TO_RTP_APP>
Example:
file ~/SDK/examples/hello_world/RTP/hello_world.vxe
-
Using the wrdbg shell, type run to execute the RTP.
Running DKMs
-
Using the wrdbg shell, connect to the target hardware or virtual machine.
-
Locate the location of the compiled DKM on the host machine.
-
Using the wrdbg shell, load the DKM application onto the target hardware or virtual machine:
module load <PATH_TO_DKM_APP>
Example:
module load ~/SDK/examples/hello_world/DKM/hello_world.out
-
Using the VxWorks serial/virtual console, confirm that the DKM has been properly loaded:
Example:
lkup "startHelloWorld"
The name of the searched function should be returned if found within the kernel symbol table.
If the value returned is zero, then no function was found.
-
Using the VxWorks serial/virtual console, start a function (provided by the DKM) by typing the function name.
Debugging Applications
Debugging RTPs
-
Using the wrdbg shell, connect to the target hardware or virtual machine.
-
Locate the location of the compiled RTP on the host machine.
-
Using the wrdbg shell, load the RTP application onto the target hardware or virtual machine:
file <PATH_TO_RTP_APP>
Example:
file ~/SDK/examples/hello_world/RTP/hello_world.vxe
With the application loaded, the RTP is ready to be debugged.
For more information on the wrdbg shell and the commands available, see the WRDBG Reference Guide.
Debugging DKMs
-
Using the wrdbg shell, connect to the target hardware or virtual machine.
-
Locate the location of the compiled RTP on the host machine.
-
Using the wrdbg shell, load the DKM application onto the target hardware or virtual machine:
module load <PATH_TO_DKM_APP>
Example:
module load ~/SDK/examples/hello_world/DKM/hello_world.out
-
Using the wrdbg shell, create a task using one of the functions provided by the DKM:
task create <FUNCTION>
Example:
task create startHelloWorld
With the task created, the DKM is ready to be debugged.
For more information on the wrdbg shell and the commands available, see the WRDBG Reference Guide.
Visual Studio Code Extension
VSCode Prerequisites
Creating VSCode Applications
Creating VSCode RTPs/DKMs
-
Launch VSCode.
-
Create/open a folder (File -> Open Folder).
-
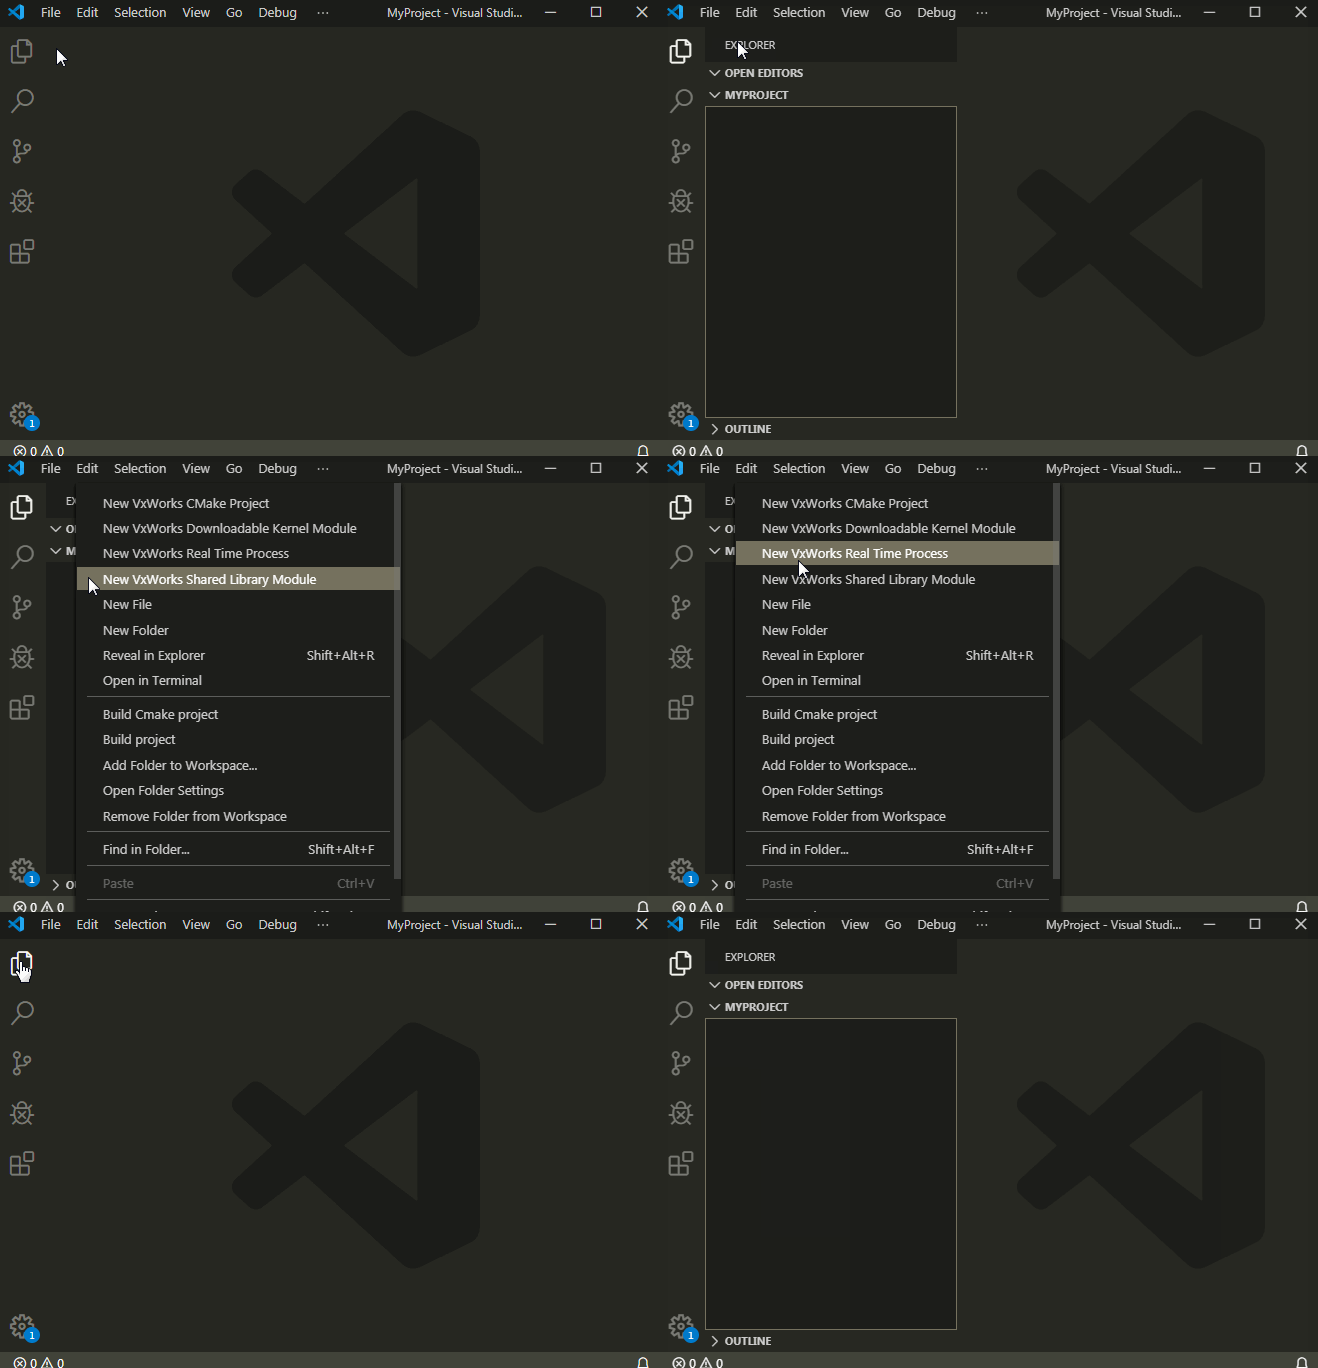
Right-click within the Explorer window (the window that displays the workspace) and select either New VxWorks Real Time Process or New VxWorks Downloadable Kernel Module.

-
Enter a new project name.
Now that the RTP/DKM has been created, it is ready to be compiled.
Creating VSCode CMake RTPs
-
Complete the CMake Setup Procedure section.
-
Launch VSCode.
-
Create/open a folder (File -> Open Folder).
-
Right-click within the Explorer window (the window that displays the workspace) and select New VxWorks CMake Project.

-
Enter a new project name.
Now that the CMake RTP has been created, it is ready to be compiled.
Compiling VSCode Applications
Compiling VSCode RTPs/DKMs
-
Launch VSCode.
-
Open an existing folder (File -> Open Folder).
-
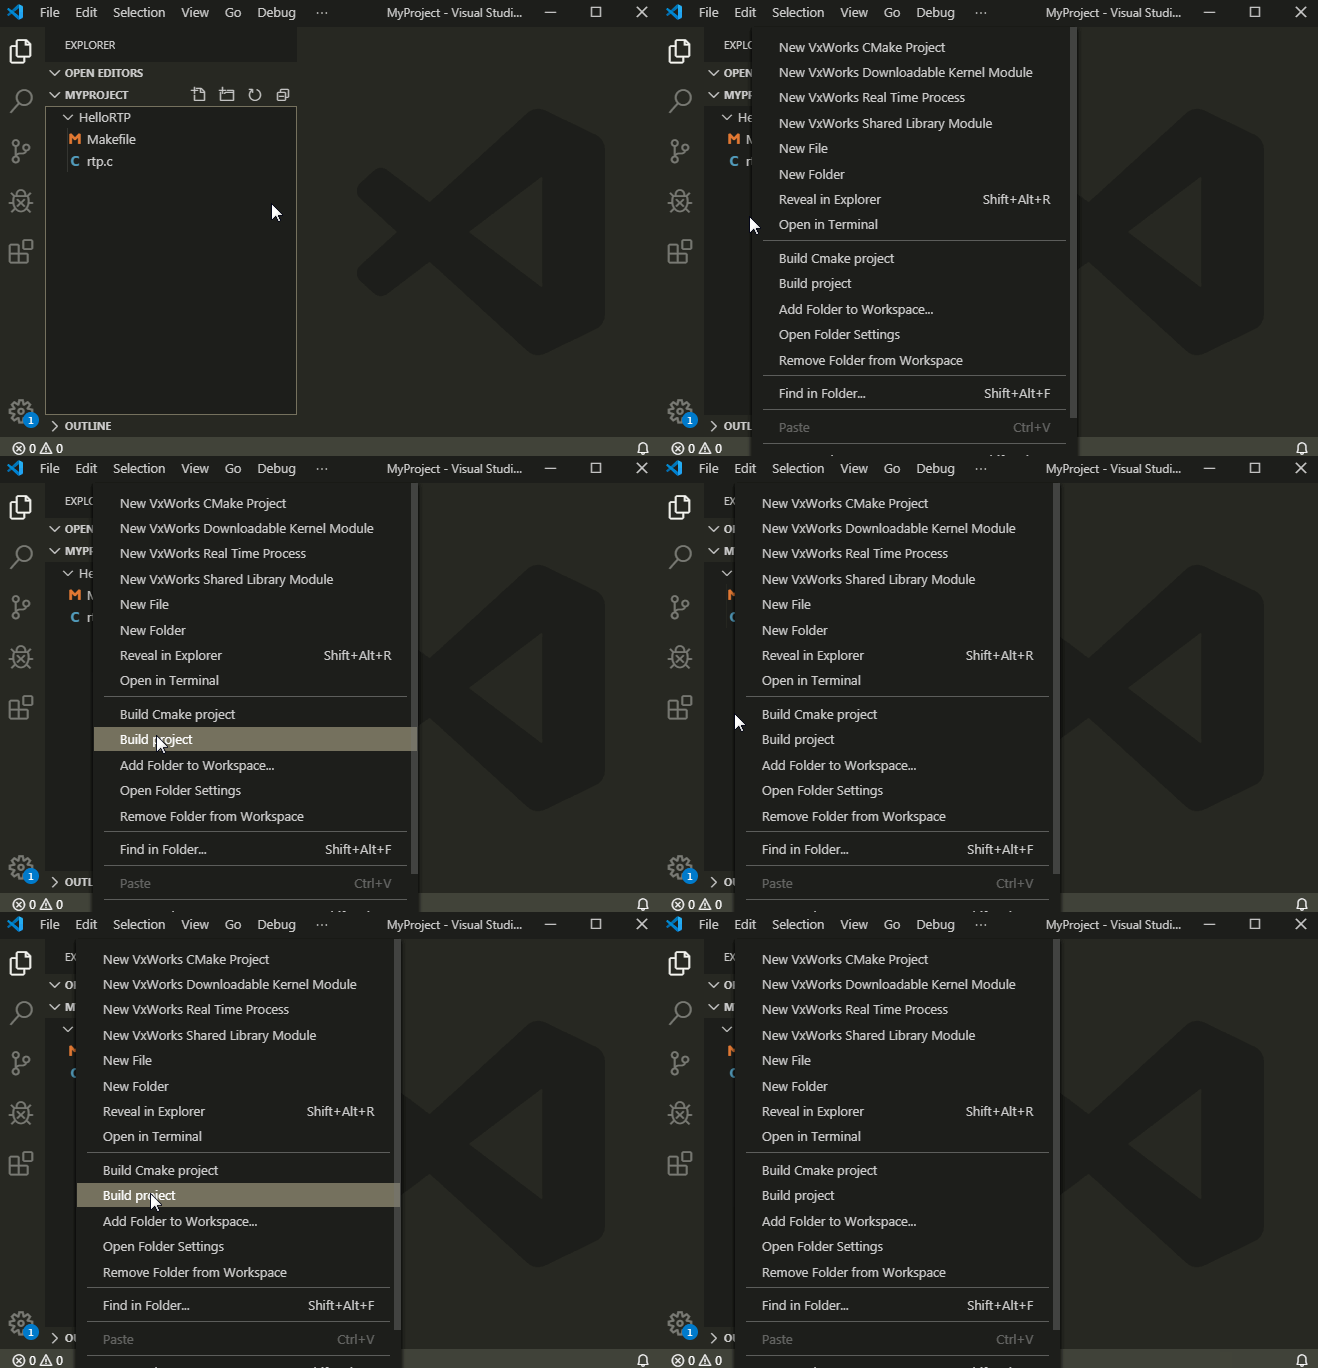
Right-click the DKM/RTP project directory and select Build Project.

Compiling VSCode CMake RTPs
-
Launch VSCode.
-
Open an existing folder (File -> Open Folder).
-
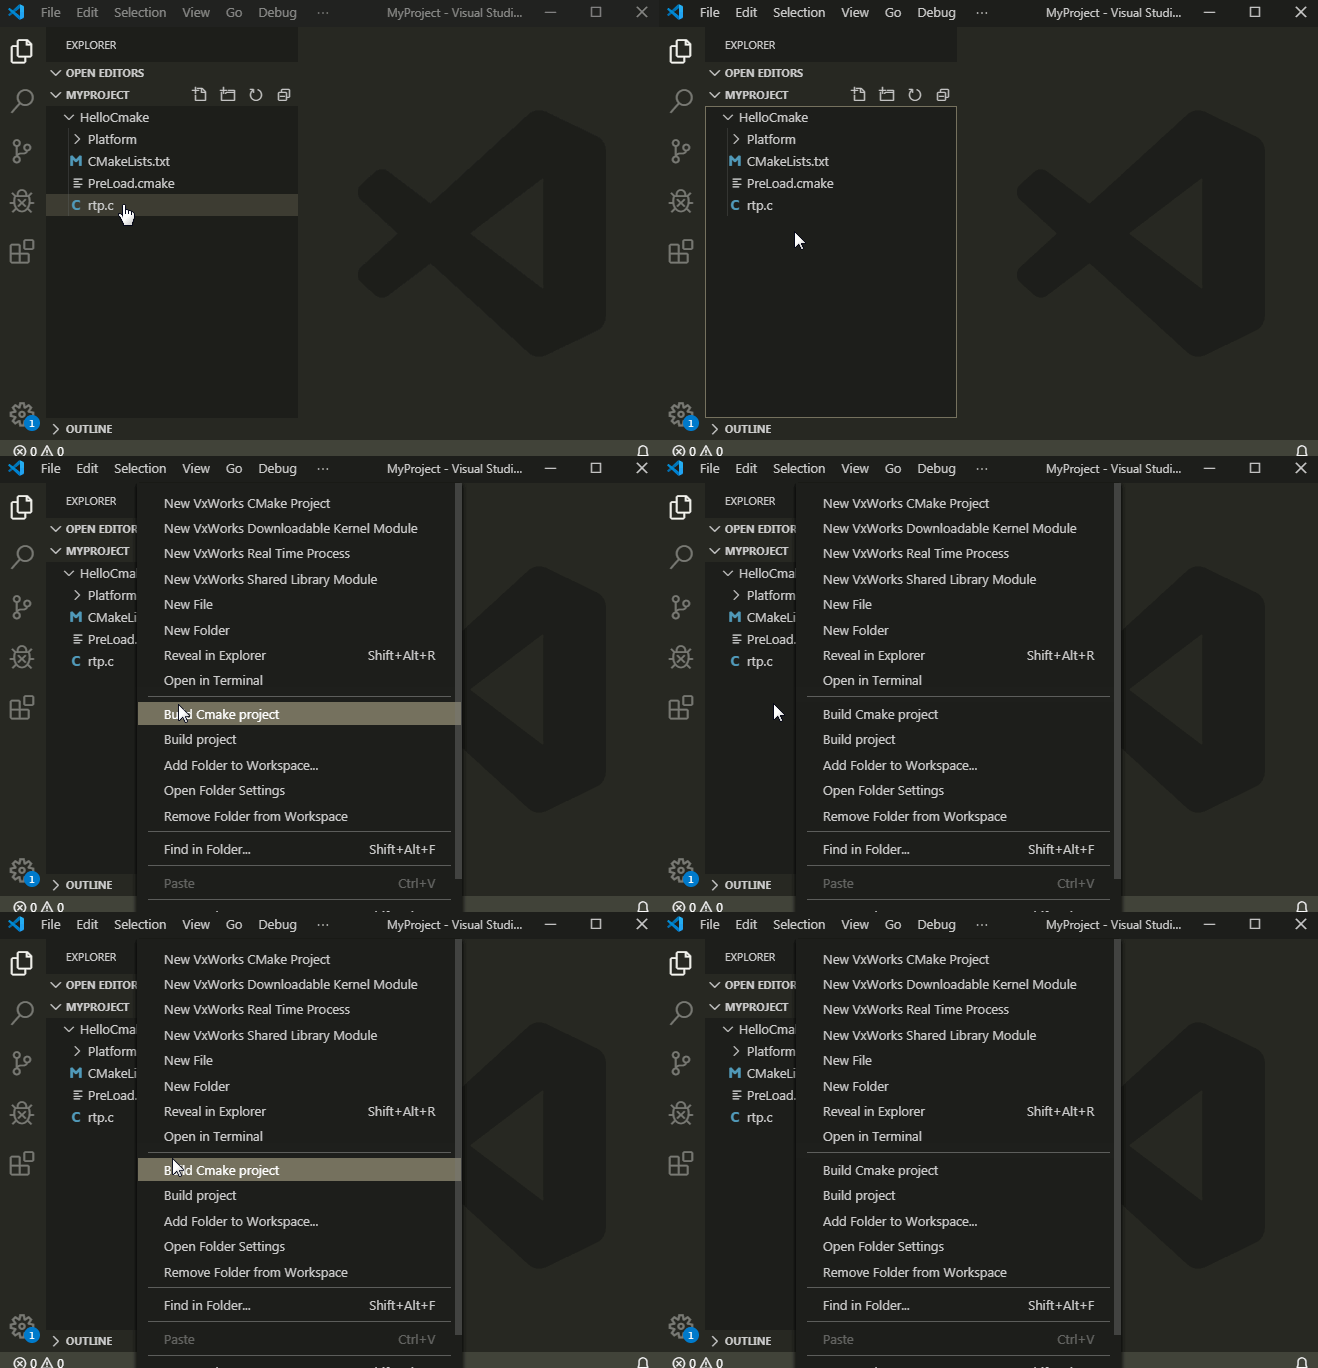
Right-click the CMake RTP project directory and select Build CMake Project.

Debugging VSCode Applications
Debugging VSCode RTPs
-
Boot VxWorks on the target hardware or emulate the machine using QEMU.
-
Complete the VSCode Dubug Support section to create a launch.json configuration file.
-
Open the Debugger window.
-
Select the drop-down button (near the top of the window) and choose the Launch RTP debug configuration.
-
Press the green ▷ button to start debugging the configured RTP.
Debugging VSCode DKMs
-
Boot VxWorks on the target hardware or emulate the machine using QEMU.
-
Complete the VSCode Dubug Support section to create a launch.json configuration file.
-
Open the Debugger window.
-
Select the drop-down button (near the top of the window) and choose the Launch DKM debug configuration.
-
Press the green ▷ button to start debugging the configured DKM.
Note: When debugging DKMs, the program will stop at the main function first. Then, you can set breakpoints as you desire.
VSCode Docker Support
Docker can be combined with the VSCode IDE and a Linux SDK to create an isolated developer environment for the Application Developer.
Note: Docker support for Windows is currently supported by taking advantage of the Windows Subsystem for Linux. Therefore, a Linux SDK is required to support Docker for Windows.
-
Complete the Docker Setup Procedure section.
-
Launch VSCode.
-
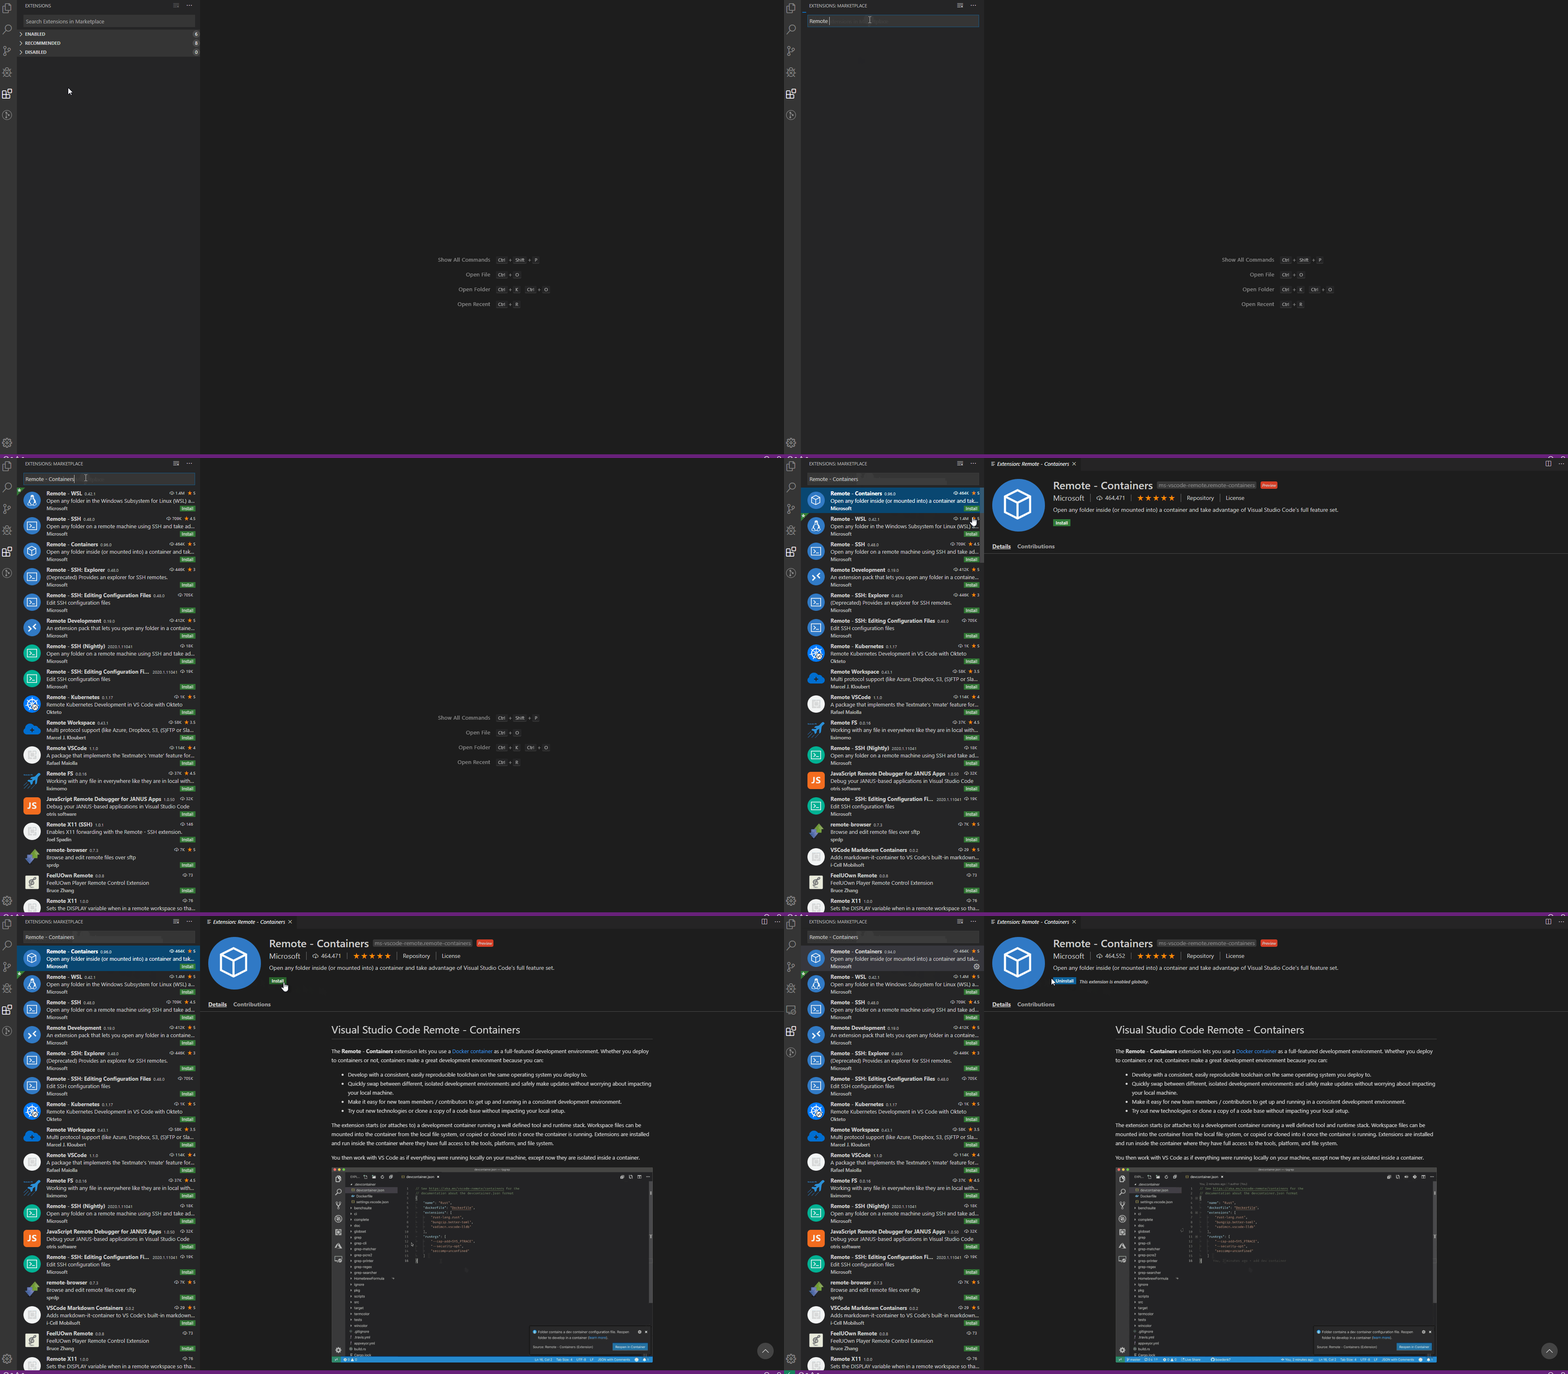
Open the Extensions window.
-
Install the Remote - Containers extension for VSCode.

Note: Users using VSCode on Windows should install the supplementary Remote - WSL extension for additional Windows Subsystem for Linux support that is used in conjunction with Windows Docker.
RemoteWslExtension
-
Open the SDK folder in VSCode. Click on the green button with angular brackets in the bottom-left corner of the VSCode IDE and select Remote-Containers: Reopen in Container.
Opening SDK in Container
You can press the details hyperlink that will appear in the bottom-right corner for status on your docker initialization.
Opening Docker Details
Note: Users using VSCode on Windows will be prompted to share their drive with Docker. Ensure to select share.
Once the docker environment is initialized, the SDK directory can be located at /home/docker/workspaces/sdk within the Docker environment.
Booting a VxWorks Target
The VxWorks RTOS image within the SDK can be booted one of two ways:
-
Directly on the targeted hardware.
-
Through a virtualization platform like QEMU.
Option 1: Hardware
For information on how to set up the target hardware and connect via serial communication, see the appropriate README file(s) within the <SDK_DIRECTORY>/bsps/<BSP_NAME>/readme directory.
Option 2: QEMU
The generated SDK can be configured to include an emulation tool which can be used to simplify the VxWorks emulation and configuration process.
Depending on what was configured by the Platform Developer, the tool may or may not already include the necessary QEMU files needed to boot VxWorks.
To see whether or not the appropriate files are included within your SDK, check the <SDK_DIRECTORY>/.metadata file to see if QEMU support is enabled.
If the SDK does not contain the necessary QEMU files, or you would like to set up your own instance of QEMU. see the QEMU Guide for information on downloading and installing QEMU.
QEMU Usage
usage: startqemu.py [-h] [-stdout | -t] [-smp CORES] [-m MEMORY]
                    [--network-address NETWORK_ADDRESS]
                    [--host-address HOST_ADDRESS] [-q QEMU_DIR]
                    [-k VXWORKS_IMAGE_PATH | -b]

optional arguments:
  -h, --help            show this help message and exit
  -stdout, --stdout     Print to the console
  -t, --telnet          Communicate with the VxWorks kernel using a telnet
                        connection
  -smp CORES, --smp CORES
                        Number of virtual cores
  -m MEMORY, --memory MEMORY
                        Amount of virtual memory to allocate
  --network-address NETWORK_ADDRESS
                        QEMU DHCP network address
  --host-address HOST_ADDRESS
                        QEMU DHCP host address
  -q QEMU_DIR, --qemu QEMU_DIR
                        Path to QEMU directory
  -k VXWORKS_IMAGE_PATH, --kernel VXWORKS_IMAGE_PATH
                        Path to VxWorks image
  -b, --bsp             Use the kernel image from the 'bsps' directory
-
Source the SDK environment file to set up your development environment and gain direct access to the QEMU tool (see the Command-line Prerequisites for more details):
Linux
source <SDK_DIRECTORY>/toolkit/wind_sdk_env.linux
Windows
<SDK_DIRECTORY>\toolkit\wind_sdk_env.bat
-
Run the following command to start the QEMU tool:
Linux/Windows
startqemu.py
This will start QEMU with a VxWorks image that matches the architecture defined by the VSB/VIP.
(NOTE: The VxWorks image used by the QEMU tool is not be the same as the one from the provided VIP).
The QEMU tool can also be invoked directly from within the SDK:
python <PATH_TO_SDK_DIR>/toolkit/sdk_tools/qemu/startqemu.py
Example:
python ~/SDK/toolkit/sdk_tools/qemu/startqemu.py
To specify your own installation of QEMU (rather than using the QEMU files provided by the SDK), simply run the same command with the -q or --qemu parameter and a path to a QEMU installation directory.
startqemu.py --qemu <PATH_TO_QEMU_INSTALL_DIR>
Example:
startqemu.py --qemu /opt/qemu-4.1.0
If no QEMU files are present within the SDK and the -q or --qemu parameter is not specified when using the QEMU tool, the current version of QEMU (if any) already installed and accessible via the PATH will be used.
Note: On Windows the default application for python programs may not be set to the Python Interpreter.
If this is the case, you will need to set the Python Interpreter as the default application for .py files.
This can be done by right-clicking the python file within the File Explorer, selecting Open With, and then selecting the appropriate Python Interpreter.
Connecting to a VxWorks Target
Interacting with a running VxWorks target can be achieved through the wrdbg shell.
-
Boot VxWorks on the target hardware or emulate the machine using QEMU.
-
From the VxWorks serial/virtual console, determine the assigned IP address of the target hardware or virtual machine by using the following command:
ifconfig
NOTE: You can use 127.0.0.1 as the IP address if using the QEMU tool.
-
Open a terminal and complete the Command-line Prerequisites section to set up the SDK environment.
-
Within the terminal, launch the Wind River Debug (wrdbg) shell from the command-line:
wrdbg
-
Connect to the target hardware or virtual machine using the wrdbg shell:
target connect vxworks7:TCP:<TARGET_IP_ADDRESS>:1534 -kernel <PATH_TO_VXWORKS_IMAGE>
Example:
target connect vxworks7:TCP:10.10.10.5:1534 -kernel ~/SDK/bsps/ti_sitara_a8_2_0_1_0/boot/vxWorks
Inline Assembly
It is possible to include assembly instructions within your C/C++ application by using the asm keyword.
#include "vxWorks.h"
void main(void){
    __asm("mov ax, bx");
}
Multiple assembly instructions can be ran sequentially within the same asm call by separating them with a semicolon.
#include "vxWorks.h"
void main(void){
 __asm("push {fp, lr}; \
        add fp, sp, #4; \
        mov r3, #0; \
        mov r0, r3; \
        pop {fp, pc};");
}
Note that assembly code is specific to the CPU that your application will be running on and that these examples may not work on your target.
Known Limitations
- When debugging RTPs and DKMs, there may be wrpython2.7 and TCF-server processes that are not cleaned up after debugging is complete. These can be cleaned up manually by the user
- The
wrdbg shell is unable to receive user input when executing an application. If the application requires user input, run the application via the VxWorks serial/virtual console
Copyright (C) 2019 Wind River Systems, Inc.


